
Taking photos is one thing. Finding the specific one you want to show someone can be an entirely different problem. That is why i had to devise a logical workflow for how I organize my photos.
How It Started
When i first got into photography I did the usual thing. Throw a hard drive into the computer, have another one for backups. Every trip i would just create a new folder, copy the photos across, process a few that i liked and the prepare for my next trip. Job done, right? Well, not so fast! That works OK if you keep all the photos in one place, don’t go to too many places and don’t take too many photos.
That trip to the Outer Banks where i got the sunset pick at the fishing pier – easy, last year…so let me look back a few folders and voila. But what happens when you have more than a few folders and more than a few trips to the Outer banks?
Why It Becomes A Problem
MrsFaceless and I take a lot of photos. Invariably we will take our cameras with us whenever we travel to see friends or family. We hail from different sides of the pond and when we go to see my family we try to do that mixed into some form of photography opportunity. On MrsFaceless’ side, that extends to both coasts of the US as well as significantly disparate latitudes. Now add friends to the mix, as well as vacations and places that we want to specifically photograph, it all adds up. In fact, in 2024 we snapped in the region of 10,000 raw images between us. To find an image quickly we need to organize our photos logically.
Workflow
We both have a workflow. Of course it is different. But as MrsFaceless has increased her image generating capacities she has started to adopt a similar method.
Keeping It Simple
I wrote previously about the reasons i built a NAS. I have two of them, in fact. One serves as my primary storage and the other is my remote storage.
After a photo session i follow this basic process.
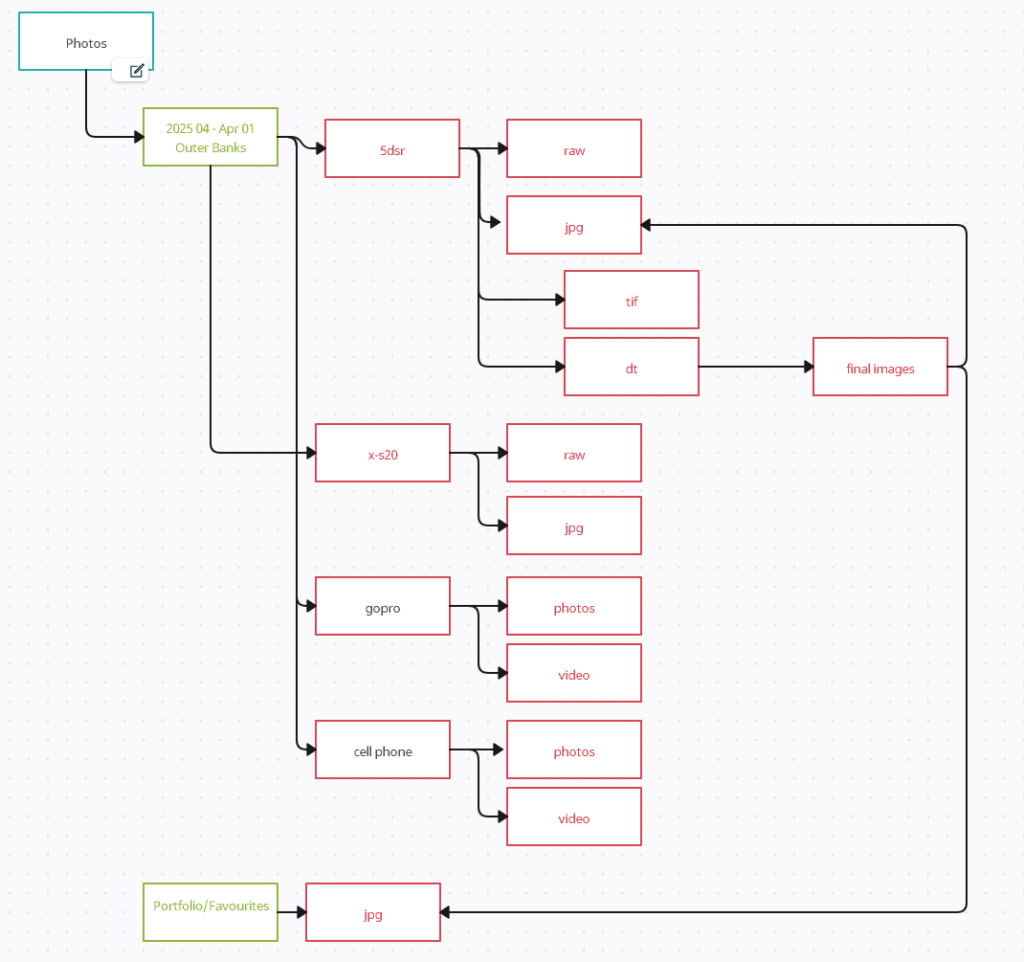
- I have a master folder on my NAS called, unsurprisingly, PHOTOS
- create a sub folder in the syntax ‘YYYY MM – MMM DD Location-or-Event’
So, for example, that would then read as
- 2025 04 – Apr 01 Outer Banks
This method works for me because:
- the reverse year/month format is a machine readable format and is sorted chronologically as i look at the list
- i repeat the month as a double check against fat finger typos
- i add the day of the month because chances are i will shoot more than one day a month and that keeps it chronological
- the location or event then confirms what/where i shot on that day
OK. Good so far.
Now, inside that sub folder will be more folders indicating the source of the images taken, such as 5DSR, X-S20, GoPro etc. Inside the camera folders will be folders for RAW and JPG; inside the GoPro would be folders for VIDEO and PHOTOS. I place all the files from the SD cards into the respective type folders.
The next step is to backup the new folders and data to an external drive i have as well as an internal drive on another PC. That gives me FOUR copies as it stands – the NAS, internal hard drive, external hard drive and the SD cards from the cameras.
File It Under…
On our digital cameras we both shoot RAW+JPG so inside each of the device folders will be folders for RAW and JPG. But his is where it gets interesting!
What we do next depends entirely upon the processing that we want to do to the image and how that fits in with the software that we use.
The Software We Use
I don’t like renting anything. That is especially true with software. Don’t get me wrong. We’re happy to pay for software that works for our methods, where we can then use that in perpetuity. We even pay for upgrades. No way do we want to become dependent upon a program that could either go away, change irrevocably or simply be priced beyond our means. Been there before.
So what we have is some newer and some older software which we know how to use to varying degrees.
- Photoshop – an older copy. It works. Mostly. What it can’t do is see the RAW images
- GIMP – latest version and similar in abilities to Photoshop but we don’t know it as well
- Photomatix – latest version which we find truly excellent for merging HDR images; some of the presets work great for image enhancement
- SharpenAI – an older version and works well with really bad imagesm bringing them back to acceptable
- DeNoiseAI – an older version and works brilliantly for removing noisel we also tend to use this for sharpening when only minor adjustment is required
- Darktable – latest version which we use to enhace the details, clarity and vibrance of the images
The Order We Process
- If we need to merge for HDR we use Photomatix first, which can read the RAW files. We save that output as TIFF with a file name showing the Photomatix adjustment used.
- To make use of the version of Photoshop we purchased many years ago we have to convert the RAW image to an TIFF file. Subsequent to any edits we save that file with a unique filename, often adding ‘-adj’ to indicate it’s been adjusted. (We are starting to use GIMP more for this stage).
- After basic tweaks we will then run the TIFF through SharpenAI or DeNoiseAI and the file is then saved once more with a unique name.
- Finally we adjust white balance and colour correct using Darktable.
- The last step is to export which we will do twice. Once as a high res JPG and also a lower res JPG for ease of emailing or putting on the phone in a portfolio folder.
Decisions, Decisions…
Using this method we have repeatability. There’s an option to go backwards in the processing workflow and make changes without having to start again from scratch. For the most part, the edits are non-destructive but multiple file copies does give us the option to experiment with final outcomes.
Backup, Backup and Backup
During the processing phase i will backup the images and all associated xml files etc. I use BeyondCompare (paid for out of our pocket) for this task and the changes really don’t take too long.
Final Tasks
Once the processing is all complete i will ensure a final sync is taken. I will then take the external drive to my remote storage location and sync the folders and files to my secondary NAS. That now, mostly, adhere to the 3-2-1 backup rule. With that complete, the SD cards can be formatted.
Keep Or Delete?
The big question here – keep or delete the images that we don’t like.
Well, the thing is, i may not like them now, but what about in the future? Or i may learn a different processing technique which will fix images with issues. For example, some photos i took 20 years ago which had noise in them. I now use DeNoiseAI to fix them and can do that because i kept those images. Once I had built the backup infrastructure adding extra capacity (or extending it) is a marginal cost.
I also use the photos to remind me of places i have been to and what i may have done wrong last time in the hopes i don’t repeat that mistake!
Indexing
As it stands i do not index my images. Nor do i currently add meta data (unless selectively publishing, which may be removed on uplaod anyway..). I have looked into indexing options. Obviously things change over time, but as i write this article Lightroom is out as it’s subscription. IrfanView is a great program but just an explorer without tagging. Photoprism is an option and has a plugin for OpenMediaVault (my NAS software), but not multi user. Darktable does not have the automation i would require. DigiKam seems interesting. I have also seen suggestions to try ACDSee, Eagle or Immich – i guess these will be next on my testing!
The Takeaway
This process has evolved over time and is by no means set in stone. However, is does work for me right now, but will doubtless continue to evolve as new software and solutions become available. The two major points here are organization of the files is key, as is backing the data up. Get those two right and you will save yourself a whole heap of headaches!